
Since our official launch last year, the HeardThat team continues to enhance the app’s AI data algorithms to widen the types of noise our app can eliminate from your conversations. Before you use HeardThat for the first time (or for the first time in a while), we wanted to share some basic first steps to help you have the best experience possible with our app. Check back here if you have any questions. We’ll update this page whenever HeardThat undergoes noticeable upgrades.
You downloaded HeardThat. Now what?


HeardThat accesses your smartphone’s robust processing power and uses Singular Hearing’s proprietary machine learning algorithms to separate speech from noise, enabling you to hear conversations better in noisy environments. Here are four steps to get started with HeardThat:
The HeardThat app works with most hearing or listening devices you already own. In order to use HeardThat, connect your preferred hearing device to your phone. Hearing devices include:
Headphones
Wired or wireless earbuds, including Airpods
Bluetooth-enabled hearing aids, working with such brands as Phonak, ReSound, Kirkland Signature, Unitron, Starkey, Widex and many more
Cochlear implants with Bluetooth streaming capability
Point your phone’s microphone toward the people you want to hear
Press the “Start” button to begin your session
Adjust the amount of noise removal you wish to have during your conversation. HeardThat enables you to control the background noise level from hearing it all to almost completely eliminating it.
You might find it helpful to watch this Getting Started tutorial video.
What is the difference between directional mode and all voices mode?

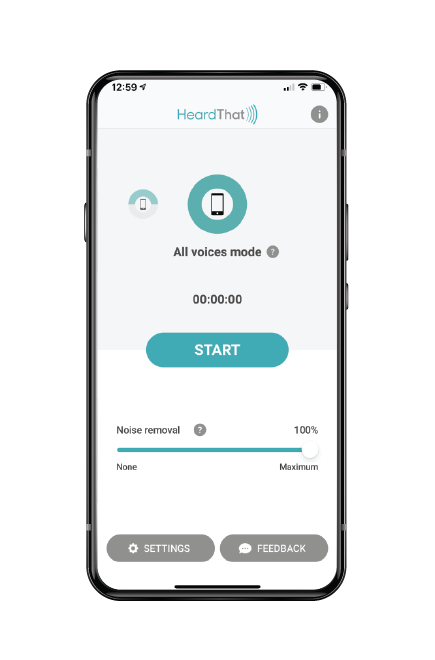
We developed Directional mode so that users have the option to not hear their own voice. Directional mode is supported on most phones, and we are expanding support all the time.
Directional mode is the default setting because it most closely mimics natural conversation. The voices you hear are only those that the phone is pointed toward, not your own.
All voices mode enables you to hear all voices from all directions, including your own.
If you’re hearing your own voice but don’t want to, follow these steps:
Set Noise removal to 100%
Select Directional mode
Point the top of the phone toward the person you want to hear.
For a visual run-through, view this video.
I have a suggestion, question, or problem
We value customer feedback and improvement suggestions. You can use feedback to:
1. Make a suggestion
2. Ask a question
3. Report a problem
4. Tell us you love the app
Submitting feedback is the easiest way to get support for HeardThat and the Feedback page makes communicating with our team quick and simple.
Whether you love the app and want to tell us you can't imagine it getting any better, have a suggestion you’d like to share, or have a compatibility question, the feedback page makes communicating with our team quick and easy.
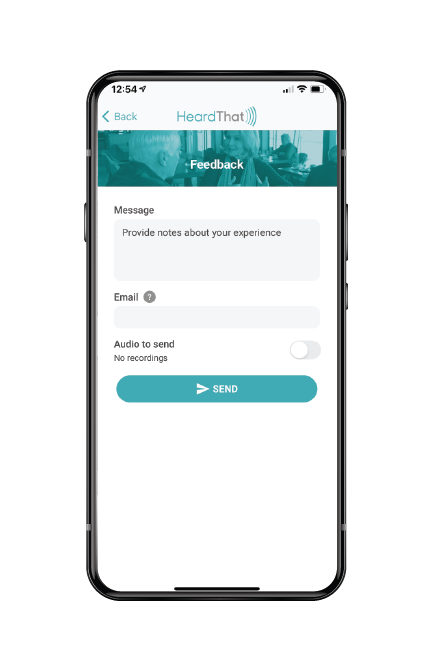
At the bottom right corner of the app interface, you’ll find a feedback button. You’ll have to stop your session in order to leave feedback. Here is a walkthrough of how to leave your comments or questions:
In the Message box, type your comment or question. This can be as long or short as needed to explain your situation. (This is optional, but important so that we better understand how to help you).
Provide your email address so we can follow up with a thank you and troubleshooting tips. We value your time and privacy and promise we will not share or misuse your email.
Attach a recent audio session recording. This helps our development team hear what you hear so we can more effectively fix any bugs or provide appropriate troubleshooting advice specific to your situation. Before you do, here’s what you should know:
By default, a recording of the last session you did with HeardThat will be sent. If you want to hear what is in that recording, you play it back using the controls below Audio to send.
If you want to send a different recording, click the button Choose new file. This presents a list of all the audio recordings that have been saved. Note that for privacy reasons, recordings are not kept for very long. So it’s best to send feedback soon after a session ends.
If a recording has been sent with a previous feedback, it will have an arrow next to it. If you click on that recording it will select it and you can see the message that went with it.
If you sent feedback with audio when your phone was not connected to wifi, you may see an indicator that shows that feedback has been queued up to be sent when the phone is connected again.
Press Send to submit the feedback. Note that if the phone is not connected to Wi-Fi at this point, you will be asked if you want to automatically send the feedback later, once the phone has connected. This will avoid incurring data charges.
If you think of any questions or comments while you’re not using the app, you can always reach us at support@singularhearing.com.